Step by step guide to setup Stripe on WP FullPay v7.0
Use this guide to get started on setting up v7.0 of WP Full Pay. At first there's an introduction to v7.0 in general, and after that it is divided into sections depending on your existing setup, so start with the intro and then pick the section that best fits your scenario.
Introduction
WP Full Pay v7.0 is a major update in more ways than one. The key change is a move away from the older "Stripe Elements" that handles the secure communication with Stripe, to the updated "Stripe Payment Element" which provides a simple and clean UI to allow customers to select the payment method of their choice and enter the necessary information. Along with the UI upgrade, we have also upgraded to Stripe Connect, which provides a more secure way of connecting to Stripe while at the same time making it easier for us to support your Stripe setup.
Payment Element
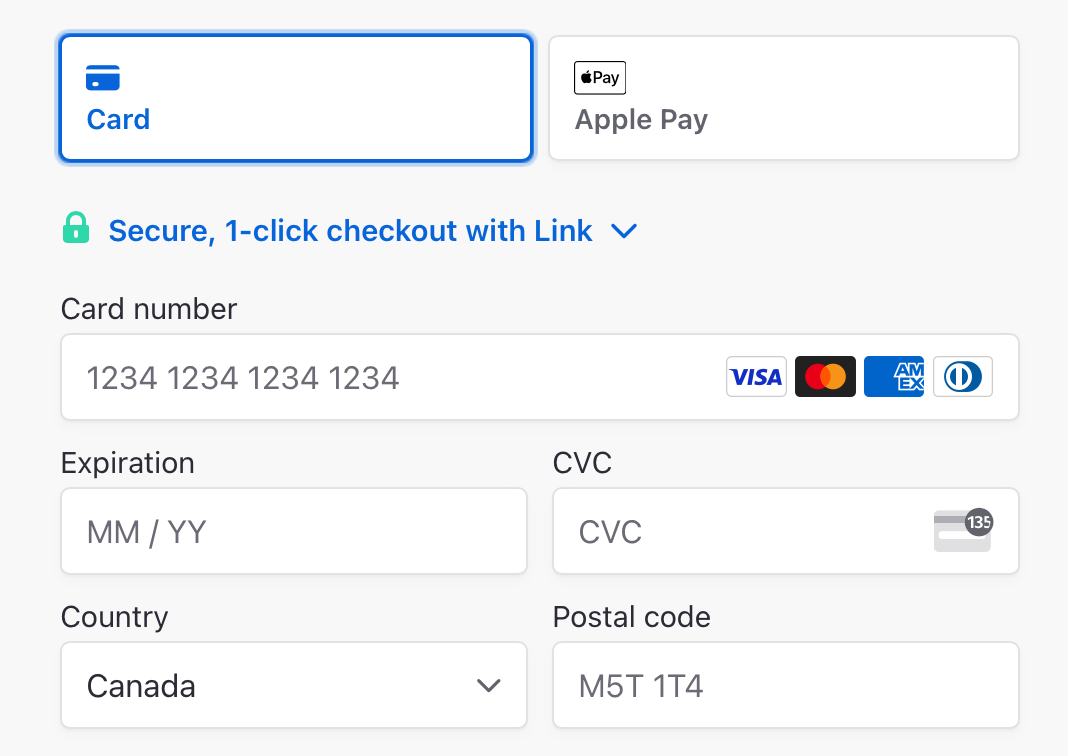
The new Stripe Payment Element offers many advantages. Read more about it at Stripe Payment Element. Below is an example of how the Payment Element looks with Apple Pay and Stripe's Link wallets both enabled.
Stripe has an extensive overview about Payment Element.
The payment element is Stripe's recommended UI and the form fields used in earlier versions of FullPay will be deprecated by Stripe in 2024.
Stripe Connect
Stripe Connect is a better way to connect WP Full Pay to your Stripe account. It is more secure as it removes the need to share your secret key, and it is one of the Stripe recommended ways of connecting an app to Stripe. It also gives us limited access to your account to better help support your Stripe setup. This greatly increases our ability to support what is likely the most mission critical aspect of your site.
Stripe Connect is free to use for all account holders. If you already have a Stripe account, upgrading to Stripe Connect doesn’t impact your ability to collect payments or your current setup of Stripe.
To learn more about Stripe Connect, see the Stripe page about Connect.
Getting started with v7
Select a section below depending on your current situation:
- I'm new to WP Full Pay and have no Stripe account
- I'm new to WP Full Pay but already have a Stripe account
- I'm already using WP Full Pay, and already have a Stripe account
- My Stripe account is already connected via Connect to another platform
- I'm also using the Members add-on or I have custom code that relies on hooks
New to WP Full Pay, no Stripe account
After you install WP Full Pay, you will have the option to apply a license key.
Once you have installed WP Full Pay and optionally applied a license key, next you will need to create a Stripe account and connect it.
To create and connect your Stripe account, follow these steps below:
- In WordPress admin, navigate to Full Pay → Settings.
- Select "Stripe account" at the top.
- Click the "Connect test account" button and wait to be redirected to Stripe.
- During the Stripe onboarding flow you will be prompted to create a new account. Follow the instructions and supply the necessary information.
- Once the Test setup is complete, click the "Connect live account" and supply any missing information.
Once both Live and Test accounts show "connected" you're ready to continue to the Next steps section.
New to WP Full Pay, have Stripe account
After you install WP Full Pay, you will have the option to apply a license key.
After you install WP Full Pay and optionally applied a license key, you can move forward to connecting your existing Stripe account.
Follow these steps below to connect your existing Stripe account:
- In WordPress admin, navigate to Full Pay → Settings.
- Select "Stripe account" at the top.
- Click the "Connect test account" button and wait to be redirected to Stripe.
- During the onboarding flow you will need to log in with your existing Stripe credentials and select your existing account.
- During the Stripe onboarding flow you will be prompted to supply the necessary information.
- Once the Test setup is complete, click the "Connect live account" and supply any missing information.
Once both Live and Test accounts show "connected" you're ready to continue to the Next steps section.
Already using WP Full Pay and have a Stripe account
V7.0 is built to allow you to continue using your existing forms, until you go through the Connect flows.
- In WordPress admin, navigate to Full Pay → Settings.
- Select "Stripe account" at the top.
- Assuming your site is already in Live mode, click the "Connect live account" button and wait to be redirected to Stripe.
- During the onboarding flow you will need to log in with your existing Stripe credentials and select your existing account.
- During the Stripe onboarding flow you will be prompted to supply the necessary information.
- Once the Live setup is complete, click the "Connect test account" and supply any missing information.
- That's it. Your existing forms etc. will continue to function as is.
Note: if you also use the Members add-on, or have custom code that relies on hooks, make sure to go over the Add-on and custom hook configuration section.
Already connected to another platform via Stripe Connect
First off, if you're not sure whether this applies to you or not, check https://dashboard.stripe.com/settings/apps to see if your Stripe account is already connected to another app.
Stripe dictates that an account can only be connected to one platform/app at a time. If you're unable to disconnect from any existing apps, reach out to our support for additional help. You will need to setup a new sub-account under your credentials, and setup products, subscriptions etc. from scratch. Unfortunately this is a Stripe imposed limitation that we cannot get around.
Next steps for new users
Now that you have successfully connected your Stripe account to WP Full Pay, you have to complete a few additional steps before you're ready to go live and start accepting payments.
- Setup webhooks on Stripe according to the Setting up webhooks article. Note that WP Full Pay is functional without webhooks, but certain actions do require webhooks.
- Create your products in live mode and in test mode.
- Now you're ready to create your first WP Full Pay form:
- Make sure you've set your account to be in test mode via the toggle on the Stripe account configuration page.
- Go to WP Full Pay → Forms.
- Create and configure a new form:
- Note that when in test mode, only test products are available. Similarly for live mode, only live products are available.
- Copy the short code and paste it on a test page (ideally an empty page without any other plugins active).
- Publish and view the page; the form will now load with the payment element and other fields selected.
- Test the form by using a Stripe test card like
4242 4242 4242 4242using any expiry and CVC.
- Once everything is working as expected, switch the Stripe account to Live mode, and proceed to setup your live form(s) that will be used to take payments from your customers.
Note: once you switch account modes, form(s) using the other mode will no longer work and will result in an error when viewed.
For more detailed instructions, see the help documentation in the Creating Forms section.
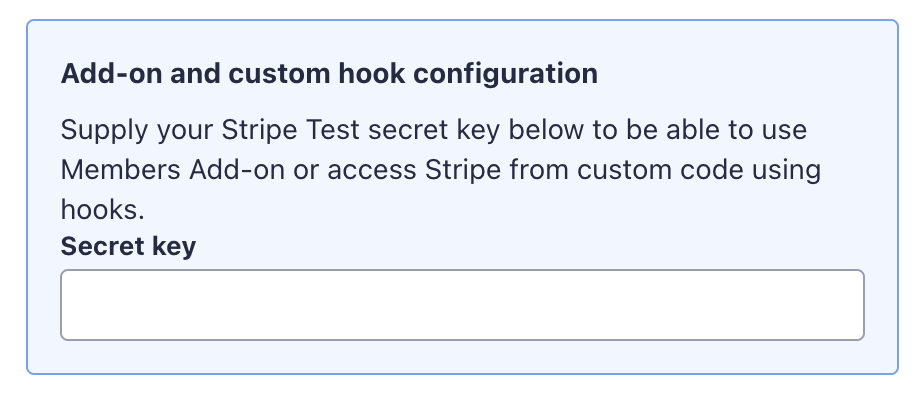
Add-ons and custom hook configuration
Due to how hooks work, and the way add-ons depend on them, they don't use the new Connect link you set up. This means that they require your Stripe secret key to function.
To ensure add-ons and custom code continues to work, make sure your live and test secret keys are in the "Add-on and custom hook configuration" box.